![]()
(goto author's website at
www.wech.com.my)
It is the author's intention to produce this guide to assist the Autocad® users in pressure vessel drafting in an efficient manner. Complete
command will not be described but only practical methods and recommendation
(which generated through author experience will be introduced. It is ideal that
the readers to have sound knowledge in the field of software-based drafting
before exploring this guide.
The purpose of this guide is specifically but
not limited to Autocad release 2000 and/or pressure vessel drafting. Users of
Autocad other than release 2000 and/or pressure vessel drafting might find it
useful provided that the users can grasp the concept and idea throughout this
guide to solve their individual problems which are generally similar in nature.
January 2000
Last updated on 25 Mar 2008
![]()
|
|
1.1 |
Acad.dwt file set-up --- for default drawing setting & system variables |
|
|
1.2 |
Acad.pgp file set-up --- for command alias |
|
|
1.3 |
Acad.lsp file set-up --- for programme start-up AutoLisp |
|
|
2.1 |
|
|
|
2.2 |
|
|
|
2.3 |
|
|
|
2.4 |
Blow-up details - prepare, scale and dimension |
|
2.5 |
Alternative way for blow-up details - copy from other drawing or insert from library drawing |
|
|
|
2.6 |
|
|
|
3.1 |
|
|
|
3.2 |
|
|
|
4.1 |
ANSI flange & European fitting etc. |
|
|
4.2 |
Drawing symbol for welding, bubble, numbering etc. |
|
|
4.3 |
Title block A0, A1, A2, A3 and A4 size |
|
|
4.4 |
Standard drawing |
|
|
4.5 |
Welding details |
|
|
|
|
![]()
1) INITIAL AUTOCAD
SOFTWARE SET-UP AND CUSTOMIZATION
Although the software is ready to be used
after installed, it is not efficient to begin a new drawing because all the
settings are not customized according to users' needs and practice, which might
include some of the following items:-
NOTE: Throughout this text, words in uppercase
refer to Autocad command, keywords or system variables.
Item 1 to 4 required changes on acad.dwt file,
whereas item 5 required editing on acad.pgp and acad.lsp file. Use and ASCII
text editor to edit acad.pgp, acad.lsp and acad.mnu file and save in plain text format.
Item 6 required editing on acad.mnu files.
Complete explanation of customization on
acad.mnu file which affects the pull-down menu, screen menu, function key,
digitizer (tablet) menu, slide (or icon) menu and pop-up menu is beyond the scope of this
guide. The user can also explore the CONFIGURE (under FILE pull-down menu) which
affects the hardware and software environmental settings.
Acad.dwt file is
usually stored in subdirectory "support" upon installation. Unless the
user change the Autocad preference, acad.dwt file is the default template or
prototype file where all the new files created will be completely similar to
this acad.dwt (see section 2.1). Use OPEN command and make changes as
described below on
acad.dwt file. Alternatively, ones might overwrite their acad.dwt file with the
acad.dwt file attached to this guide, which contains the following setting and
changes :
NOTE : The title
block might contains others font or style when required.
|
System variable/Setting |
Value |
Description |
|
DIMASO |
1 |
To maintain the dimension associate property |
|
DIMSCALE or overall scale |
1 |
Keep the default value. To be changed in each drawing (see Sec. 2.2). |
|
Text height |
2.5 |
Unit in mm |
|
Text gap |
1.5 |
Unit in mm |
|
Arrow size |
2.5 |
Unit in mm |
|
Extension above line |
0.5 |
Unit in mm |
|
Baseline increment |
8 |
Unit in mm |
|
Vertical text alignment |
Above |
|
|
Horizontal text alignment |
Text inside |
|
|
Text orientation |
Align with dimension line |
|
|
Suppress trailing zero |
Yes |
e.g. precise dimension like "150.00" will be show as "150" only. |
|
Dimension STYLE |
ROMANS |
Width factor 0.85, font ROMANS |
|
COLOR |
YELLOW |
For all dimensioning entities, including text, dimension line, leader etc. |
NOTE : Unless the
DIMASO is set to zero or the dimension is already exploded, the dimension will
take up the color of the block (i.e. BYBLOCK as appear when using LIST), not the
color of the layer. Overall scale will be reset after confirmation of plotting
scale (see section 2.2)
|
Layer Name |
Linetype |
Color |
Usage |
|
Shell |
Continuous |
Cyan |
For all visible objects entities, center line, hidden, tangent line |
|
Dimension |
Continuous |
Yellow |
For dimensioning, text and annotation, leader |
|
Revision |
Continuous |
Red |
For revision cloud and revision mark |
|
Insulation |
Phantom2 |
Green |
For insulation cladding outline |
|
TB |
Continuous |
Magenta |
For title block and border |
Layer "Shell" to be the current layer. If the user not intend to put the entities into different layer, maintain the default layer "0" as the current layer. (see Sec. 3.1 and 3.2 for the trade-off comparison of using multiple and single layer drawing.)
Blipmode - 0;
mirrtext - 0; aperture - 5; pickbox - 5; highlight - 1; ucsicon - 0
Acad.pgp file is
usually stored in "support" directory. It is an ASCII text file that
stores the Autocad command short-cut known as alias where the user can change or
add in according to their need and preference. The author found that use of
keyboard input command with the aid of alias will work even faster than using
ordinary pull-down menu, screen menu and tool bar, in the absence of customized
digitizer board.
Some recommended
alias are as follow:-
|
A, |
*ARC |
|
F, |
*FILLET |
|
C, |
*CIRCLE |
CP, |
*CHPROP |
|
|
DV, |
*DVIEW |
CF, |
*CHAMFER |
|
|
E, |
*ERASE |
MI, |
*MIRROR |
|
|
L, |
*LINE |
AR, |
*ARRAY |
|
|
LA, |
*LAYER |
T, |
*TRIM |
|
|
M, |
*MOVE |
RR. |
*ROTATE |
|
|
P, |
*PAN |
EX, |
*EXTEND |
|
|
PL, |
*PLINE |
ST, |
*STRETCH |
|
|
MS, |
*MSPACE |
SC, |
*SCALE |
|
|
PS, |
*PSPACE |
O, |
*OFFSET |
|
|
R, |
*REDRAW |
LI, |
*LIST |
|
|
RG, |
*REGEN |
HG, |
*HIGHLIGHT |
|
|
Z, |
*ZOOM |
V, |
*VIEW |
|
|
DD, |
*DDEDIT |
SO, |
*SOLID |
|
|
DDA, |
*DDATTE |
LTS, |
*LTSCALE |
|
|
DDM, |
*DDMODIFY |
IN, |
*DDINSERT |
|
|
DI, |
*DIST |
I, |
*INSERT |
|
|
DT, |
*DTEXT |
BL, |
*BLOCK |
|
|
BR, |
*BREAK |
OS, |
*OSNAP |
|
|
X Or EXP |
*EXPLODE |
EL, |
*ELLIPSE |
|
|
CC |
*COPY | WB, | *WBLOCK |
NOTE : Follow the
syntax of the acad.pgp file when add in new alias. Do not go overboard on
systems with tight memory as each alias uses small amount of memory.
AutoLisp (in Autocad 2000, it's called
VisuaLisp) is a built-in programming language in Autocad where the code is
written by ASCII text editor and save under file name with extension .lsp. It is
compiled and loaded into memory in Autocad drawing editor by the following
command :
COMMAND: (load
"c:/ABC/XYZ/FILENAME")
When specify the path of the file (not require
the full path if it is the predefined Autocad search path), use forward slash
"/" instead of back slash "\". Once loaded successfully, the
programme can be called like an ordinary Autocad command to perform some
calculation, combine a few Autocad command into one (like a macro), to draw some
entities or any operation which is capable according to AutoLisp command
functions.
.lsp files must be re-loaded each drawing
session. However, acad.lsp file (which is normally located directly under the
directory which Autocad is installed) is a special .lsp file which will be
loaded automatically. Acad.lsp which is empty by default is therefore use to
load all the required .lsp files which could be stored elsewhere.
A suggested acad.lsp
file is as below:-
![]()
;VERSION 2.1 DATE : 5 JAN 99
;===========================================================================
;NOTE : THESE .LSP PROGRAMME WORKS WITH THE
EXIST OF LAYER "SHELL",
;"DIMENSION", "INSULATION"
& "REVISION". DEGREE IN COUNTER-CLOCKWISE
;WITH ZERO AT EAST.
;WARNING : FOR COMMAND CR, EE, EP, SP, MP, LCC,
BC, BRL, BKL, EL, SL, PN, PB, RAD,
;ORIGINAL OSMODE WILL BE CHANGED IF THE
COMMAND IS CANCELLED AT CERTAIN STAGE.
;
;LIST OF GLOBAL VARIABLE THAT CAN'T BE
OVERWRITTEN(EXCEPT BY USING "RS"):
;*REV FOR REVISION.LSP, *i FOR BUBBLE, BUBBLE1
;*D1, *D2, *SH FOR RADDIM,RADDIM1, PLANNOZZ,
PLANBUB.LSP, RESET.LSP
;LIST OF GLOBAL VARIABLE THAT CAN BE
OVERWRITTEN:
;*pt3 FOR BUBBLE, BUBBLE1, WELD1, WELD2 &
WELD3.LSP
;*pt4 FOR BUBBLE1, NOZZMAR1.LSP
;
;==================================================================
(PROMPT "PLEASE WAIT WHILE LOADING
ACAD.LSP....")
;
; (VMON) ;TO ALLOW MORE RAM
;
(LOAD "C:/CHEW/LSP/RESET") ;TYPE
"RS" TO RESET GLOBAL VARIABLES *D1, *D2 & *SH.
;
;TO ACCESS DATA FROM ENTITY DATA LIST:
(DEFUN DXF (CODE ELIST)
(CDR (ASSOC CODE ELIST)))
;CODE=0(ENTITY TYPE),10(CENTER/END
POINT),40(RADIUS) ETC.
;EXAMPLE: (SETQ EN (ENTSEL) CPT (DXF 10 (ENTGET
(CAR EN)))
; OR (SETQ CPT (DXF 10 (ENTLAST)))
;
;USER INTERFACE "GET" SUBROUTINES
(LOAD "C:/CHEW/LSP/USERGET") ;UDIST,
UKWORD, USTR, UINT, UREAL, UPOINT, UANGLE
;
;FOR ZOOM & VIEW:
(DEFUN C:VA () (COMMAND "VIEW"
"R" "A"))
(DEFUN C:VD () (COMMAND "VIEW"
"R" "D"))
(DEFUN C:ZZ () (COMMAND "ZOOM"
"P"))
(DEFUN C:ZX () (COMMAND "ZOOM"
"0.8X"))
;
;FOR DIMENSIONING SHORT-CUT:
(DEFUN C:d () (COMMAND "DIST" "NEA"
PAUSE "PER"))
(DEFUN C:te () (COMMAND "DIM1"
"TEDIT"))
(DEFUN C:ne () (COMMAND "DIM1"
"n"))
(DEFUN C:hor () (COMMAND "DIM1"
"HOR"))
(DEFUN C:ver () (COMMAND "DIM1"
"VER"))
(DEFUN C:le () (COMMAND "DIM1"
"L"))
(defun c:ra () (command "dim1"
"rad"))
(defun c:dia () (command "dim1"
"dia"))
(defun c:up () (command "dim1"
"upd"))
;
;MISCELLANUOUS SIMPLE SHORT-CUT COMMAND:
(defun c:cr (/ os) (ssget) (setq os (getvar
"osmode"))
(command "osnap" "cen")
(command "array" "p"
"" "p" )
(prompt "\nPick center point :")
(command pause 2)
(prompt "\nEnter rotation angle :")
(command pause "y" ) (setvar "osmode"
os))
(defun c:ee (/ pt1) (setq os (getvar "osmode"))
(command "osnap" "end"
"line" pause)
(while (setq pt1 (getpoint (getvar "lastpoint")))
(command pt1) )
(command "")
(setvar "osmode" os) (princ))
(defun c:ep () (command "line"
"end" pause "per" pause "") )
(defun c:lcc () (command "line"
"cen" pause "cen" pause "") )
(defun c:mp () (ssget) (setvar "cmdecho"
1) (setvar "highlight" 0)
(command "move" "p"
"" "end" pause "per" pause)
(setvar "highlight" 1) )
(defun c:sp (/ pt1 pt2) (setvar "cmdecho"
1)
(setq pt1 (getpoint"\nPick first point
:")
pt2 (getcorner pt1 "Pick second point
:"))
(command "stretch" "c" pt1
pt2 "" "end" pause"per" pause) )
;
;CHANGE LAYER, COLOR & LINE TYPE:
(DEFUN C:1 () (COMMAND "CHPROP"
"SI" PAUSE "C" 1 ""))
(DEFUN C:2 () (COMMAND "CHPROP"
"SI" PAUSE "C" 2 ""))
(DEFUN C:3 () (COMMAND "CHPROP"
"SI" PAUSE "C" 3 ""))
(DEFUN C:4 () (COMMAND "CHPROP"
"SI" PAUSE "C" 4 ""))
(DEFUN C:5 () (COMMAND "CHPROP"
"SI" PAUSE "C" 5 ""))
(DEFUN C:6 () (COMMAND "CHPROP"
"SI" PAUSE "C" 6 ""))
(DEFUN C:7 () (COMMAND "CHPROP"
"SI" PAUSE "C" 7 ""))
(DEFUN C:CE() (COMMAND "CHPROP"
"SI" PAUSE "LA" "SHELL" "LT"
"CENTER" "C" 1 ""))
(DEFUN C:CT() (COMMAND "CHPROP"
"SI" PAUSE "LA" "SHELL" "LT" "BYLAYER"
"C" "BYLAYER" ""))
(DEFUN C:HI() (COMMAND "CHPROP"
"SI" PAUSE "LA" "SHELL" "LT"
"HIDDEN" "C" 1 ""))
(DEFUN C:DO() (COMMAND "CHPROP"
"SI" PAUSE "LT" "DOT" ""))
(DEFUN C:INS() (COMMAND "CHPROP"
"SI" PAUSE "LA" "INSULATION" "LT" "BYLAYER"
"C" "BYLAYER" ""))
(DEFUN C:TL() (COMMAND "CHPROP"
"SI" PAUSE "LA" "SHELL" "LT"
"PHANTOM2" "C" "R" ""))
;
;FOR TEXT EDITING :
(LOAD "C:/ACAD/LSP/ATEXT") ;TYPE
"AT" TO RUN
(LOAD "C:/ACAD/LSP/UNDETEXT") ;TYPE
"UT" TO RUN
(LOAD "C:/ACAD/LSP/BRKTEXT") ;TYPE
"BT" TO RUN
(LOAD "C:/ACAD/LSP/JUSTEXT") ;TYPE
"JT" TO RUN
(LOAD "C:/ACAD/LSP/CHGHGT") ;TYPE
"CHH" TO RUN
(LOAD "C:/ACAD/LSP/CHGTEXT") ;TYPE
"CHT" TO RUN
(LOAD "C:/ACAD/LSP/CAPITAL") ;TYPE
"CAP" TO RUN
(LOAD "C:/ACAD/LSP/EDITTEXT") ;TYPE
"DDE" TO RUN
;
;DRAW ITEM/NOZZLE BUBBLE, WELD SYMBOL, CLOUD
& REVISION MARK:
(LOAD "C:/ACAD/LSP/BUBBLE") ;TYPE
"BB" TO DRAW CIRCULAR BUBBLE ITEM MARK
;(LOAD "C:/ACAD/LSP/BUBBLE1") ;TYPE
"BB" TO DRAW HEXAGONAL BUBBLE ITEM MARK
;(LOAD "C:/ACAD/LSP/NOZZMARK") ;TYPE
"NM" TO DRAW CIRCULAR BUBBLE NOZZLE MARK
(LOAD "C:/ACAD/LSP/NOZZMAR1") ;TYPE
"NM" TO DRAW HEXAGONAL BUBBLE NOZZ. MARK
(LOAD "C:/ACAD/LSP/PLANBUB") ;TYPE
"PB" TO DRAW CIRCULAR BUBBLE ON PLAN
(LOAD "C:/ACAD/LSP/PLANNOZZ") ;TYPE
"PN" TO DRAW HEXAGONAL BUBBLE ON PLAN
(LOAD "C:/ACAD/LSP/COPYBUB") ;TYPE
"CB" TO RUN FOR CIRCULAR BUBBLE
(LOAD "C:/ACAD/LSP/RADDIM") ;TYPE
"RAD" TO RUN FOR HEX. BUBBLE
;(LOAD "C:/ACAD/LSP/RADDIM1") ;TYPE
"RAD" TO RUN FOR CIRCULAR BUBBLE
(LOAD "C:/ACAD/LSP/REVISION") ;TYPE
"REV" TO RUN
(LOAD "C:/ACAD/LSP/RCLOUD") ;TYPE
"RC" TO RUN
(LOAD "C:/ACAD/LSP/WELD1") ;TYPE
"W1" TO RUN
(LOAD "C:/ACAD/LSP/WELD2") ;TYPE
"W2" TO RUN
(LOAD "C:/ACAD/LSP/WELD3") ;TYPE
"W3" TO RUN
;
;OTHERS LSP PROGRAMME :
(LOAD "C:/ACAD/LSP/EXLINE") ;TYPE
"EL" TO RUN
(LOAD "C:/ACAD/LSP/SHLINE") ;TYPE
"SL" TO RUN
(LOAD "C:/ACAD/LSP/ETLINE") ;TYPE
"ET" TO RUN
(LOAD "C:/ACAD/LSP/CIR") ;TYPE
"CI" TO RUN to draw circle center line
(LOAD "C:/ACAD/LSP/PIPE") ;TYPE
"PIPE" TO RUN to draw elbow
(LOAD "C:/ACAD/LSP/OFFDIA") ;TYPE
"OD" TO RUN
(LOAD "C:/ACAD/LSP/CONE") ;TYPE
"CON" TO RUN
(LOAD "C:/ACAD/LSP/CONTOFF") ;TYPE
"OO" TO RUN
(LOAD "C:/ACAD/LSP/PCD") ;TYPE
"PCD" TO RUN
(LOAD "C:/ACAD/LSP/BOX") ;TYPE
"REC" TO RUN
(LOAD "C:/ACAD/LSP/BREAKC") ;TYPE
"BC" TO RUN
(LOAD "C:/ACAD/LSP/BREAKL") ;TYPE
"BRL" TO RUN
(LOAD "C:/ACAD/LSP/CHGPROP") ;TYPE
"CL" TO RUN
(LOAD "C:/ACAD/LSP/SWAP") ;TYPE
"SWAP" TO RUN
(LOAD "C:/ACAD/LSP/BRKLINE") ;TYPE
"BKL" TO RUN
(LOAD "C:/ACAD/LSP/MSCALE") ;TYPE
"MS" TO RUN
(LOAD "C:/ACAD/LSP/MDDEDIT") ; TYPE
"DE" TO RUN
;
(PROMPT "LOADED.")
(PRINC)
![]()
Customization of
this file will change or add in new feature on pull-down, screen, pop-up, icon,
function key and tablet (digitizer) menu. The attached acad.mnu file has the
following new features:-
MORE INFO: Acad.mnl is a Lisp file that will
be loaded automatically once acad.mnu is loaded. Others menu Lisp file with the
same filename will also be loaded once a menu file with the same filename is loaded.
E.g. load "flange.mnu" will load AutoLisp expression in "flange.mnl".
AutoCad Release 14
digitizer with custom-made template:
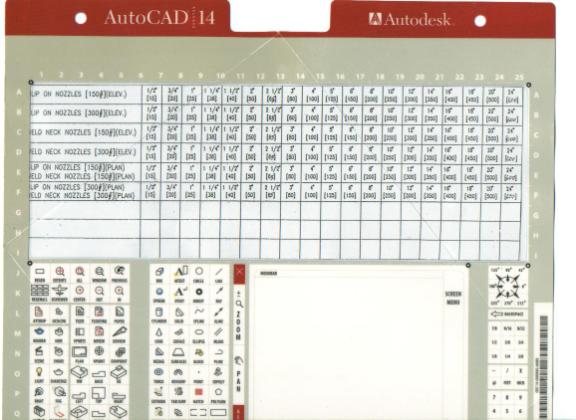
![]()
2) PRESSURE
VESSELS/STORAGE TANK DRAFTING
Once Autocad is loaded/running, it is ready to
draw on the UNNAMED.dwg file. Autocad will ask for the filename upon the first SAVE.
Give the filename same as drawing number e.g. 148800 for drawing number
HM-1488-00 (example only).
Alternatively, a new drawing might begin while
editing an existing drawing without exit Autocad. Save the current working
drawing, click NEW from FILE pull-down menu. A dialogue box appears and ask for
default drawing and new filename. The suggested default drawing is ACAD.dwt file
which has been customized as in Section 1 to meet all the needs. Use other
drawing as template if you want to create a new drawing which is same as the
existing drawing (use this technique instead of copying the file to another and
rename it). You might enter the new filename at this point. If you leave the new
filename blank and hit OK, Autocad will ask for the filename upon the first
SAVE.
Use OPEN from FILE
pull-down menu instead of NEW on the next editing session.
The acad.dwt's drawing limits are set to A1
drawing size. Since the actual tank size is usually larger than the A1 size, the
first line (usually shell length) that we drawn is not fully shown on screen.
Hence, follow the steps stipulated below:
@0,1500 for vertical
tank with shell length 1500
or @1500,0 for
horizontal tank with shell length 1500
or use the
rectang.lsp programme to draw the complete shell (see Sec. 1.3)
It is preferable to
place orientation view above the elevation (for vertical tank) and place
orientation view on the left/right to the side elevation (for horizontal tank).
In any case, use third angle projection.
After the tank
overall size outline is drawn, it is ready to be completed with a title-block.
Always insert title block BEFORE dimensioning and detailing. Use DDINSERT
command to insert the appropriate title-block drawing (A1, A2, A3, 4A or A0).
WARNING : In Autocad
Release 12, do not use INSERT command and specify the filename by giving full
path method, this may possibly overwrite the original file that is inserted by
the existing drawing. Use INSERT only for local blocks.
It is usually that the title block is smaller
than the tank as below:
For vertical tank:
Or for horizontal tank:
Do not EXPLODE the title block yet, SCALE
(scale-up if title block smaller than tank or vice-versa) the title block to
allow it to accommodate the tank elevation and orientation. Consider space for
dimensioning, item bubble, material list and detailing. ZOOM EXTENT once to have
a maximum view.
TIPS: Use UNDO to
restore title block to original size and SCALE again repeatedly until a suitable
size is obtained.
WARNING : Never
SCALE the tank to suit the title block. This will cause inconvenience in doing
dimensioning and further editing.
Remember the scale used to SCALE the title
block (e.g. 12.5). EXPLODE the title block and immediately change the overall scale (under pull down menu
SETTING and DIM STYLE) or DIMSCALE system variable to the appropriate value ( e.g. 12.5), as well as edit
the text "Scale" on the title block to the required scale (e.g. 12.5).
dimensioning can be done anytime only from now go on. Also, set LTSCALE to 15
multiplied by plot scale (e.g. 15 x 12.5 = 187.5).

2.3.1
Use Of Associate Dimension
In acad.dwt, the associate dimension mode
DIMASO is set 1 (i.e. in contra with zero for depressed mode). This will cause all
the dimensions drawn out (except LEADER) remain in blocks. The advantages of
DIMASO set to 1 are:-
·
Automatic updating of the dimension
figure upon editing, e.g. STRETCH, SCALE
·
Enable the text height, arrow size
etc. to be updated with UPDATE (a DIM: command) after the dimension overall
scale has been
change. This is done if we change the title block size after we've done
dimensioning. (However, the dimension line location will not be adjusted
accordingly and the LEADER and text is not affected by UPDATE).
The DIMASO will determine the mode (block or
not a block) of those newly drawn dimension, but not previously drawn or
exploded dimensions. Exploded dimensions cannot be "unexploded" with
DIMASO reset to 1. So always make use of associate dimension.
In Autocad R12, use of associate dimension
will not allow MOVE, DDEDIT command to change dimension text, but instead :-
·
Use TEDIT (a DIM: command) to move,
rotate, or restore dimension text to original position.
·
Use NEW (a DIM: command) to edit
dimension text.
However, in later Autocad version, dimension
text can be edited as ordinary text using DDEDIT command.
TIPS: Use of <> represent original
dimension figure. E.g. "<> I/D" represent "1000
I/D" if 1000
is the dimension measured by Autocad. The use of <> will allow updating or
restoring original value of dimension figure. <> can be used either in NEW
or making new dimension.
2.3.2
Dimension Line Location And Arrangement
Follow the value given below on the dimension
line location :
For vertical tank/vessel :
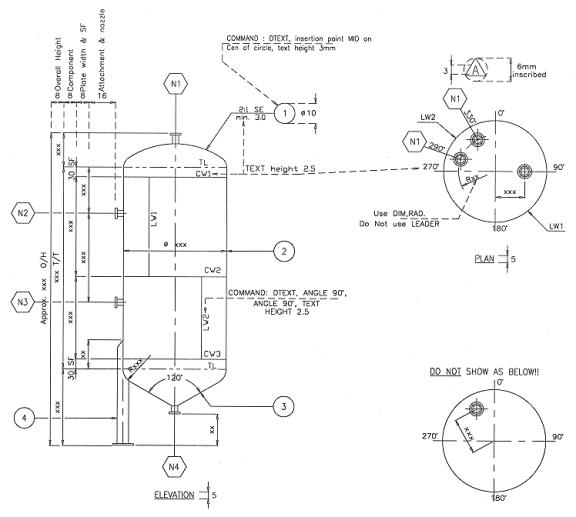
For horizontal tank/vessel:
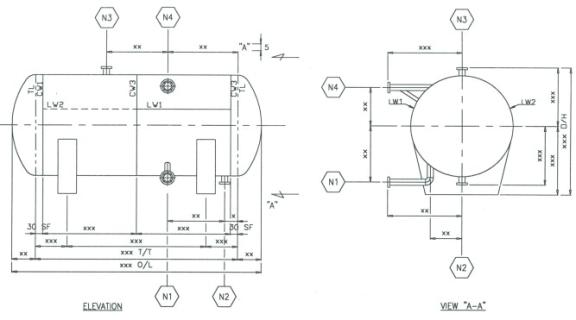
i.
The value (gap between dimension lines, item bubble diameter and
text height) shown above is the actual size we want after plotted out. Hence,
the above value must be multiplied by the scale of the drawing (E.g. Drawing
scale is 1:10, hence gap = 80, bubble diameter = 80 etc.)
ii.
To facilitate the location of dimension line, offset a few lines to the
distance required. Move lines to one side so that easier to erase them after
use. Then do dimensioning and pick PERPENDICULAR to the appropriate line drawn
when AutoCad prompts for dimension line location. Erase those guidelines after use.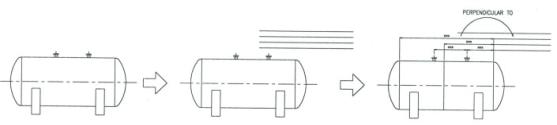
iii.
When do dimensioning on the same dimension line level, use CON (a DIM:
command) instead of VER or HOR, without re-specifying the same extension line.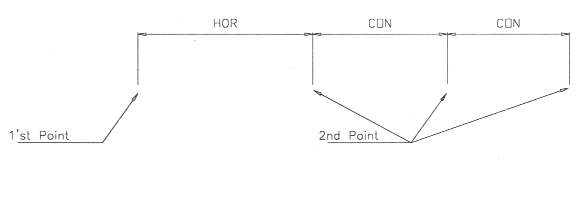
iv.
Use DTEXT, MID of center of bubble to locate the text in the bubble. Use
F (fit text) if the text is too long, etc. N13a.
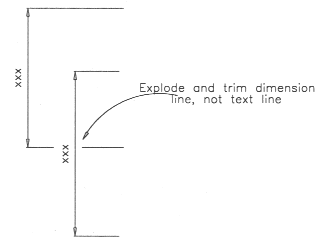
v.
Certain dimension must be exploded and trimmed when the dimension
extension line intersect dimension text line.
NOTE: The attached BUBBLE, NOZZMARK, PLANBUB
and PLANNOZZ.lsp can automate the drawing of item bubble and nozzle mark.
2.4.1
Preparation and Scale of the Blow-up Details
If the details (e.g. attachment or nozzle) is
shown as same view to the general arrangement view, it is usually to COPY from
the general arrangement and SCALE up to the required legible size as blow-up
details. If further editing on the detailing is required after COPY, do it
before SCALE to allow editing in actual scale.
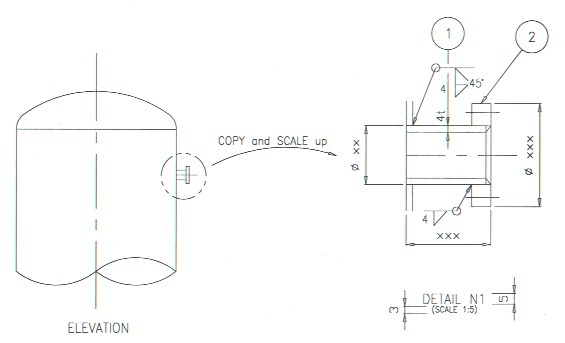
The scale of the detailing is calculated as
below:-
![]()
Example : General Arrangement scale = 1:10
The detailing has
been SCALE -up 2 times.
Hence, the scale of
detailing = 10/2 = 1:5
Do dimensioning after SCALE to allow proper
allocation of the dimension line. However, this might cause the figure measured
by Autocad differ from the actual dimension and the user has to input the
correct figure manually.
This can be remedied by setting DIMLFAC to the reciprocal of detailing scale before dimensioning on the detailing (default value of DIMLFAC is 1.0 as in acad.dwt file). For instance, if the detailing scale is 1:5, set DIMLFAC to 1/5 or 0.2. This will force the dimension figures shown to be multiplied by 0.2. This is done by typing the figure (just follow the figure given by Autocad) rather than hit enter to accept the default.
WARNING : Always reset DIMLFAC to 1.0 after
detailing to avoid confusion. Also, the use of UPDATE command will restore the
dimension figure according to the current DIMLFAC value, unless the default
dimension figure is overwritten by the user that forgone the associate property
of the dimension.
TIPS : While doing editing or dimensioning on
a small area of drawing for a long period of time, it is sometimes inconvenient
to use ZOOM command. Consider to save the required on-screen view using VIEW
command with a view name of "D". Restore this view each time using VD
(an Autolisp command as mentioned in Sec. 1) instead of ordinary ZOOM command,
which may need a few steps. The VA command is used to view the entire drawing
(instead of ZOOM ALL or EXTENT) to reduce the time taken on drawing
regeneration.
2.5 Alternative way for blow-up details
Instead of preparing or copy the detail from the assembly view of the drawing, one might copy the detail from other drawings (Sec.2.5.1) or insert from library drawing (Sec. 2.5.2).
2.5.1 To copy blow-up details from other drawing

2.5.2 To insert blow-up detail from library drawing
See Sec. 4 for recommended/typical details that shall be put into library drawing.
There are two options in preparing the library drawing, hence there are two difference way to insert them into working drawing according to which option you choose. However, both options required you to determine the on-plot scale of the detail (as appear on paper ) while preparing the library drawing.
Option 1:
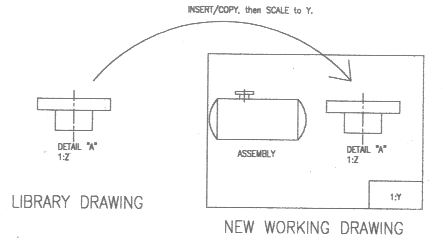
Option 2:
(Note: step 5 and 6 is same as step 4 and 5 in Sec. 2.5.1)
Again, if you want to change the on-plot scale of the blow-up detail (because not enough space etc.), then the leader text height will not be correct and the spacing between dimension lines and object will also affected. Manual adjustment is required.
No matter how you prepare the blow-up detail, you shall watch-out that was DIMLFAC being used in the original drawing. If DIMLFAC was used and the dimension associate is still on (if it is not exploded), the value of the dimension will be incorrect after SCALE. (You can check if the dimension associate is on by DDEDIT the dimension text. If it appears to be <>, then it is on.) Hence, you have to EXPLODE the dimension before SCALE, or change the DIMLFAC of the working drawing and UPDATE only for the blow-up detail (not recommended way as it may unintentionally UPDATE other dimension!). The is why we shall overwrite the dimension associate (by re-entering the text or measured figure during dimensioning, no need to explode) when preparing library drawing with dimension.
Since the title block outline has been
adjusted to suit the relevant drawing size, use PLOT EXTENT will normally force
the maximum plot scale calculated by Autocad same as the required drawing scale.
If this is not the case (or for the drawing without title block), the user shall
change the plot scale value in the PLOT dialogue box. However, this method might
cause certain portion of the drawing out of the plotable area (as seen from
Preview) and hence adjustment of X and/or Y origin is required.
Make sure the pen width setting (as shown
below) is not overwritten by previous plotting session before plotting (Plot
setting is not saved with acad.dwt file but with application environmental
setting).
|
Color |
Pen Width (mm) |
Use for |
|
Red |
0.15 |
Center line, hidden line, formed head tangent line |
|
Yellow |
0.2 |
Dimensioning, leader, arrow, text |
|
Cyan |
0.25 |
All visible object (except insulation) |
|
Magenta |
0.25 |
Title block outline |
|
Green |
0.25 |
Insulation |
3.1)
Use of Different "Layers" Versus "Color and Linetype"
Whether the entities shall be drawn on
different layers or just a single layer is subjected to the practice and
requirement of the users.
The advantages of using different layers are
:-
a.
Enable visibility of certain layers only while unwanted layers to be
FREEZE.
b.
Enable plotting of certain layers only while unwanted layers to be
FREEZE.
c.
Enable change of color and linetype of entity by merely change the
property layer of the entity. The entity color and linetype will follow the
settings of the layer as long as the entity's color and linetype is "Bylayer".
Existing entities can be changed to required color and linetype of a layer by
using "CHPROP". Entities created by COPY, MIRROR, OFFSET etc. will
follow the layer of parent entity. Hence use CHPROP to change the property layer
of the entity if required. New entities will follow the color and linetype of
current layer.
d.
Enable the color and linetype of all entites on a particular layer to be
changed by merely change of the color and linetype of the layer setting. The
user do not have to use CHPROP and select all the required entities (which might take hours
of times!) in order to change the color and linetype.
e.
When a drawing is inserted into another drawing, the entities will be
inserted together with its layers where the color and linetype of the layer can be
changed by changing of the layer settings. For example, if a drawing by user A
is inserted into another drawing by user B, the user B can easily change the
entity color and linetype by changing the layer settings according to the
requirement of user B.
NOTE : If the entities are placed on layer 0,
the entities will take-up the color and linetype of the current layer of the
drawing B until the inserted block is EXPLODE. This "chameleon effect"
of layer 0 might be useful in certain cases but be a problem to another. Hence,
do not draw in layer 0 if you do not intend to EXPLODE the inserted drawing and
if you do not want the color and linetype of inserted entities (on layer 0) to
follow the current layer.
Besides, the user shall open and check the
drawing (before inserting it ) to ensure that no layer with the same layer name
to the file being inserted, but in fact they shall be two different layers.
Rename the layer (on either one of the files) to another name to avoid two
groups of entity to be mixed on same layer after insertion.
In order to have the above advantage of color
and linetype controlling, the COLOR and LINETYPE system variables shall be set to "bylayer"
or the property of "color" and "linetype" of the entity
shall be "bylayer". However, center line, hidden line etc. can be set
to red color (for example) and linetype to "center" or
"hidden" since they shall be same property no matter which layer they
are stored on. Some users might put the center line, hidden line etc. to layers
called "center" or "hidden" with the required setting. But
this is not necessary because it is very rare to change the color and linetype
of this line or just to freeze these lines.
3.2)
Drawing Entities In A Single Layer
Instead of creating entities with different
color and linetype in different layers, ones might consider to make use of only
one layers, with color and linetype as per COLOR and LINETYPE system variable or use CHPROP to
modify existing entities' color and linetype. If the advantages mentioned in Sec.
3.1 are immaterial to the users, it is actually no significant difference whether
multiple layers are used although this is usually not the case. Hence, ones
might make a conclusion that with the interface of AutoLisp short-cut command
(CT, CE, HI, TL, CL, 1, 2, 3 etc. as listed in Sec. 1.3), ones might obtain full
use of layer's advantage.
There are basically 2 types of library drawing:-
The following are the objects that shall be prepared as individual library drawing:
|
4.1 |
ANSI flange & European fitting etc. |
|
4.2 |
Drawing symbol for welding, bubble, numbering etc. |
|
4.3 |
Title block A0, A1, A2, A3 and A4 size |
|
4.4 |
Standard drawing |
|
4.5 |
Welding details |
(Detail explanation for the above will be incorporated later)
5) .DWG FILE STORING
AND HARDCOPY FILING
( This will be incorporated later)
![]()
Goto Top | Preface | Table of Contents
Courtesy:
AutoCad is a registered trade-mark of Autodesk Inc.
Geocities | Yahoo | Jasmine's Gallery
This page was last edited on 03/25/2008